Smart Home VLAN Setup: Segment IoT Devices for Security
Most smart-home advice glosses over the network. Buy the device, scan the QR code, run the app, done. The problem with that workflow is that every smart bulb, camera, doorbell, and vacuum on your home Wi-Fi shares a network with your laptop, your phone, your bank login, and the data on your work computer. When (not if) one of those IoT devices gets compromised, segmentation is what stops the bleed.
VLAN-based segmentation isolates IoT devices on their own network where they can talk to the cloud (which they need) and to your phone for control (which you need) — but cannot reach anything else. The implementation lives on your router. The setup is straightforward if you follow a clean rule set, and this guide walks the rules and the rationale together with a direct hand-off to the pfSense firewall rules tutorial for the actual firewall syntax.
Why IoT Devices Need Network Segmentation
Smart-home devices are the weakest link on most home networks. They run firmware that updates rarely, ship with default credentials that customers do not change, and contact servers in dozens of countries on dozens of ports. A 2024 University of Central Florida audit of 500 popular smart-home products found that 28% had at least one CVE-rated vulnerability rated 7.0 or higher, and the average device had not received a firmware update in 14 months.
The threat model is not that someone hacks your smart bulb to read its bulb-state. The threat is lateral movement: an attacker who controls a compromised IoT device on the same flat network as your computers can scan ports, attempt to authenticate to file shares, capture broadcast traffic, and pivot into devices that hold real value (your laptop, your NAS, your IP camera footage, the work computer in your home office).
The economic logic is asymmetric. The cost of a VLAN setup is one weekend afternoon. The cost of recovering from one compromised home device that owned everything else on the network is days of work and possibly a credit-monitoring subscription. Even if the personal-data risk is low, the convenience of a clean network where Roku traffic does not interrupt video calls is worth the setup time on its own.
The Three Levels of Network Segmentation
Network segmentation is a spectrum, not a binary. Three practical levels cover almost every home situation:
Level 0: Flat network (no segmentation). Everything on one subnet, one Wi-Fi network, no firewall rules between devices. The default for 95% of home networks. This is what you almost certainly have right now.
Level 1: Guest network for IoT. Most consumer routers offer a “Guest” SSID that runs on a separate subnet. Move IoT devices to the Guest network and you get partial isolation — the guest network can reach the internet but not your main network. Limitation: most guest networks block client-to-client traffic, which breaks Chromecast and Apple AirPlay between phone and IoT device. Acceptable for cameras, locks, sensors. Awkward for anything you cast to.
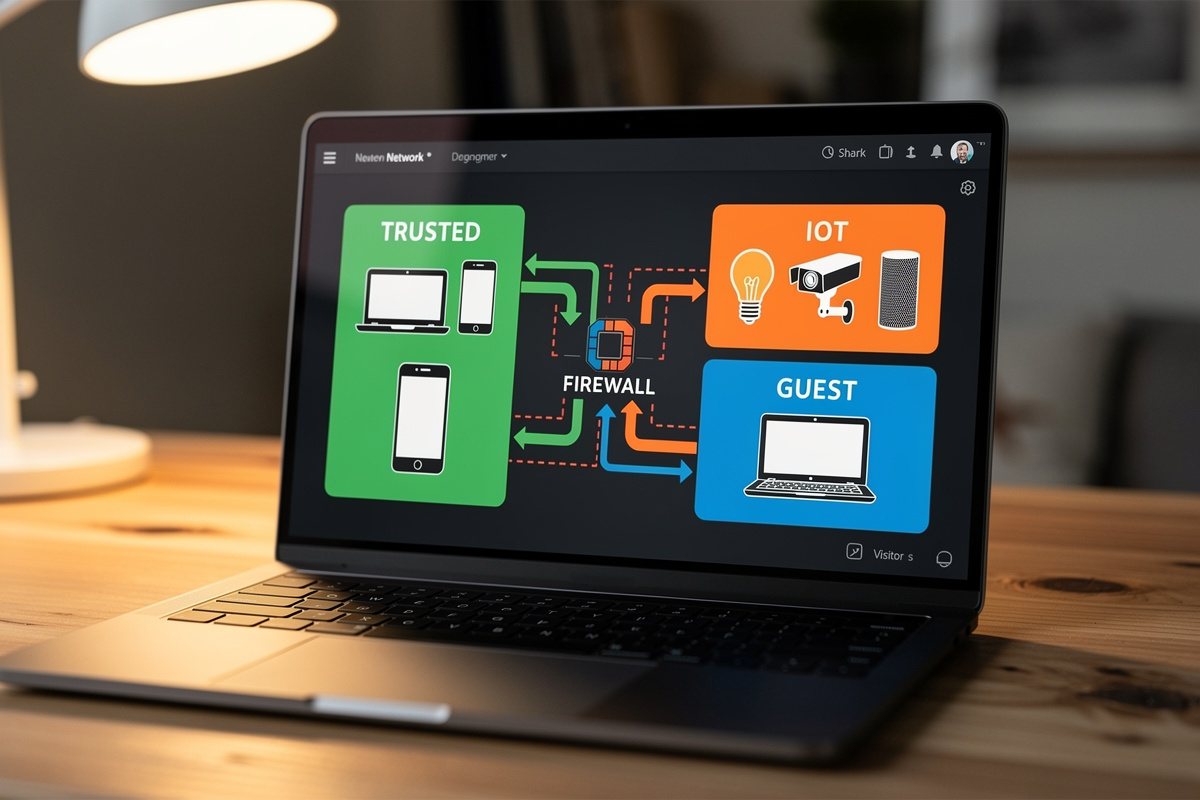
Level 2: VLAN with selective rules. Three or four VLANs (Trusted, IoT, Guest, sometimes Cameras) with explicit firewall rules between them. Allows phone-to-speaker casting via mDNS reflectors while keeping a hard wall between the IoT subnet and your laptops. This is the level that delivers real security without breaking the “but my watch needs to find the speaker” experience.
Level 3: Per-device microsegmentation. Every device gets its own firewall policy. Enterprise-grade. Overkill for residential use unless you are running 50+ smart-home devices, in which case you are no longer running a smart home but a small commercial deployment.
Level 2 is the right target for almost every home that has both smart-home gear and any device that holds personal data. The full implementation lives on the router, and the firewall rule set is what makes Level 2 work.
What You Need to Set Up an IoT VLAN
The hardware requirements are modest but they exclude most consumer all-in-one routers. The minimum stack:
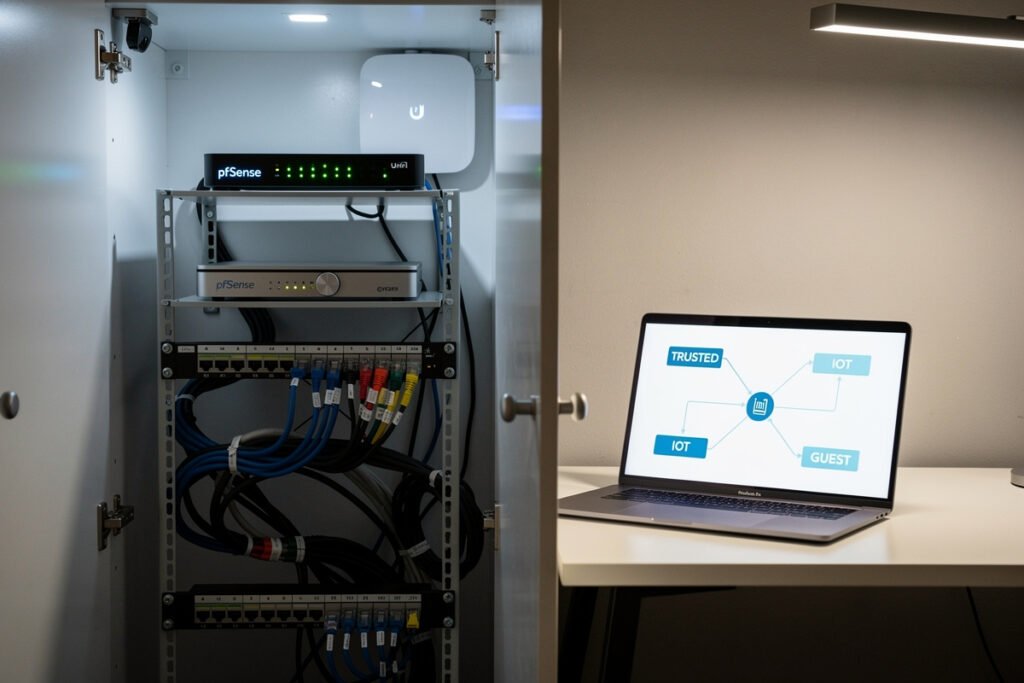
1. A router that supports VLANs. Specifically, a router with the ability to (a) define multiple LAN subnets, (b) tag VLAN traffic, and (c) write firewall rules between them. Consumer routers from TP-Link, ASUS, and most ISP-provided units do not support this in stock firmware. Routers that do: any pfSense or OPNsense build, UniFi Dream Machine line, MikroTik RouterOS devices, OpenWRT-flashed hardware, and the higher-end TP-Link Omada series.
2. A managed switch (if you have wired devices). An unmanaged switch passes all traffic through; a managed switch can tag traffic with a VLAN ID. UniFi Lite Switch 8 ($99), TP-Link TL-SG108E ($35), or any 8-port managed switch under $60 covers a typical home.
3. An access point that supports multiple SSIDs with VLAN tagging. UniFi AP, TP-Link Omada EAP, or any access point that lets you map an SSID to a specific VLAN ID. ISP-provided APs almost never support this — most home VLAN setups eventually replace the ISP AP.
Total hardware cost for a clean VLAN-capable home network: $200–500 depending on whether you already have any of the pieces. The pfSense + UniFi AP combination is the most documented and easiest to debug. Most smart-home-related smart home mistakes that waste money involve devices that should never have shared a network with sensitive endpoints in the first place.
Step-by-Step VLAN Setup
The high-level sequence on any platform:
Step 1: Define the VLANs. Three minimum: VLAN 10 (Trusted, your laptops and phones), VLAN 20 (IoT, smart-home devices), VLAN 30 (Guest, occasional visitors). Many setups also add VLAN 40 (Cameras) because cameras have a different threat profile and benefit from being further isolated.
Step 2: Assign IP subnets to each VLAN. Conventional choice: 10.10.10.0/24 for Trusted, 10.10.20.0/24 for IoT, 10.10.30.0/24 for Guest, 10.10.40.0/24 for Cameras. The subnet pattern makes firewall rules easier to read later.
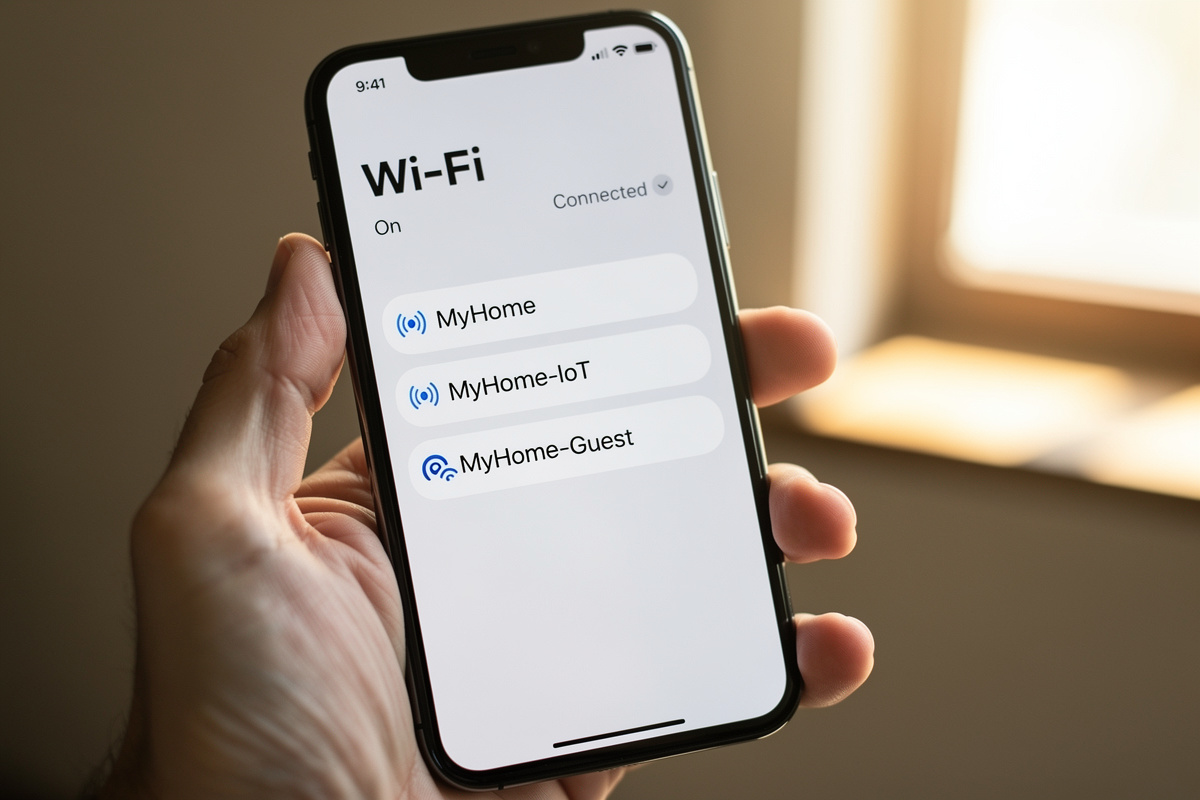
Step 3: Configure the access point to broadcast separate SSIDs mapped to VLAN IDs. SSID “MyHome” → VLAN 10. SSID “MyHome-IoT” → VLAN 20. SSID “MyHome-Guest” → VLAN 30. The mapping is what causes a phone joining the main SSID to land on the trusted subnet, and a smart-bulb joining the IoT SSID to land on the IoT subnet.
Step 4: Write firewall rules between VLANs. This is the longest step and the one where the pfSense firewall rules tutorial earns its keep — it walks the actual GUI flow, the order rules need to be written in (firewall rules are evaluated top-to-bottom, first match wins), and the common pitfalls like forgetting to allow DHCP and DNS within the IoT VLAN before adding cross-VLAN deny rules.

Step 5: Migrate devices. Smart-home devices need to be re-onboarded onto the new IoT SSID. Most apps re-pair via Bluetooth and require a network change in the app’s setup flow. Plan an evening: it takes 5–10 minutes per device.
Firewall Rules: What IoT Devices Should and Shouldn’t Reach
The starting rule set that works for most homes:
| Source VLAN | Destination | Action | Why |
|---|---|---|---|
| IoT | Internet (any port) | Allow | Devices need cloud control |
| IoT | Trusted (any) | Block | IoT must not reach laptops/NAS |
| IoT | Cameras (any) | Block | Lateral movement protection |
| IoT | Other IoT (any) | Allow | Hub-to-bulb, hub-to-sensor |
| Trusted | IoT (any) | Allow | Phone controls IoT |
| Trusted | Cameras (HTTP/HTTPS only) | Allow | Watch streams via app |
| Cameras | Internet (specific IPs only) | Allow | Cloud sync to vendor only |
| Cameras | Trusted (any) | Block | Compromised camera can’t reach laptop |
| Guest | Internet (any) | Allow | Visitors get internet |
| Guest | All other VLANs | Block | No visitor access to your devices |
The single most important asymmetry: Trusted → IoT allowed, IoT → Trusted blocked. This lets you control your smart home from your phone while preventing a compromised smart-home device from reaching your phone or laptop. Modern smart-home apps establish connections initiated by the phone, not by the device — so the asymmetric rule pattern works for almost every brand.
Wi-Fi SSID Strategy: Same SSID, Different VLAN?
Two valid approaches, with different trade-offs.
Approach A: Multiple SSIDs (recommended). “Home” for trusted, “Home-IoT” for smart devices, “Home-Guest” for visitors. Phones connect to “Home”; smart bulbs connect to “Home-IoT” during onboarding. The downside is that some IoT devices only connect to 2.4 GHz, so the IoT SSID typically runs 2.4 GHz only. Easier to debug; clearer to onboard new devices.
Approach B: Single SSID with WPA3 device classification. One SSID, but the AP places devices on different VLANs based on MAC address or pre-shared key. UniFi Network 7+ supports this with “Private Pre-Shared Key” (PPSK). Cleaner from a user-experience standpoint (one SSID and password to remember) but harder to reason about during debugging. Recommended only after you have the multi-SSID approach working.
For setups with under 30 IoT devices, Approach A wins on simplicity. For larger setups (50+ devices, multiple types), Approach B starts paying back the configuration time. The smart sensor buyer’s guide details how different sensor brands handle network onboarding — some require open networks during setup, which a hardened VLAN actively breaks.
mDNS, Casting, and the “But It Won’t Find My Speaker” Problem
The single biggest practical complaint about IoT VLANs is that Chromecast, AirPlay, and Sonos all stop working after segmentation. Cause: these protocols rely on mDNS (multicast DNS) to discover devices, and multicast does not cross VLANs by default.
The fix is to run an mDNS reflector on the router that selectively forwards multicast announcements between specific VLANs. pfSense calls this “Avahi”; OPNsense, MikroTik, and UniFi each have their own implementation. Configuration: enable Avahi, list the VLANs to bridge (Trusted ↔ IoT for casting; not Trusted ↔ Cameras for security).
The mDNS reflector is the difference between a working segmented network and a network where users keep asking why their music stopped. Skipping it is the most common reason home users abandon VLANs after a week.
Migration: How to Move Existing Devices Without Breaking Them
Migrating an existing smart home onto a fresh VLAN setup takes 1–2 evenings depending on device count.
Order of migration: least-critical first. Spare bulbs, then random plugs, then cameras (these often need router changes in the app), then locks (these are most painful to re-pair, do them when you have an alternative entry plan), then voice assistants. Save anything with Bluetooth-only fallback for last because they are the easiest to recover if the network change fails.
Per-device pattern: open the manufacturer app → settings → “remove device” or “factory reset” on the physical device → re-pair on the new IoT SSID via the app’s setup flow. Most apps cache cloud associations even after network changes, so re-onboarding is required, not just a Wi-Fi password update. The smart locks guide notes which lock brands keep network-independent codes during migration (good) versus which lock you out during the re-pair window (bad).
Common Mistakes
Three mistakes account for most “I tried VLANs and it broke everything” complaints.
Forgetting to allow DHCP and DNS within the IoT VLAN. Devices on a new VLAN cannot get IP addresses if the firewall rules block DHCP traffic to the router. Symptom: every IoT device shows “no internet” forever. Fix: explicit allow-DHCP and allow-DNS rules at the top of the IoT firewall stack.
Skipping the mDNS reflector. Discussed above. Skipping it means your trusted-network phone cannot find your IoT-network speaker, and the spouse decides VLANs are stupid.
Locking down outbound IoT traffic too aggressively. Some devices need access to NTP servers, some need access to cloud bootstrap on first boot, some break if outbound DNS is blocked. Start permissive on IoT outbound (allow internet), restrict only after you have logs showing what each device actually contacts.
Do I need a VLAN if I already have a guest network for IoT devices?
A guest network gives you basic isolation but breaks casting and some app-to-device control. VLANs preserve casting via mDNS reflection while still isolating devices. If you only have lock-and-camera IoT, a guest network is enough. If you cast to speakers or run smart-home routines, VLANs are worth the upgrade.
Will setting up a smart home VLAN break my Alexa or Google Home?
It can if you do not configure the mDNS reflector. Alexa and Google Home discover devices on the same network via mDNS multicast. With a properly configured mDNS reflector between the trusted VLAN and the IoT VLAN, both work normally. Without it, voice control still works for cloud-routed commands but local discovery breaks.
Can I run a smart home VLAN on a regular consumer router?
Most consumer routers do not support VLANs in stock firmware. Common exceptions: ASUS routers running Merlin firmware, Netgear Nighthawk Pro Gaming line, and most TP-Link Omada units. The cleanest path is replacing the consumer router with pfSense, OPNsense, or UniFi.
How many VLANs should a home have?
Three is the practical minimum: Trusted (laptops, phones), IoT (smart devices), Guest (visitors). Many setups add a fourth VLAN for cameras and a fifth for work-from-home computers. More than five VLANs in a home is usually overengineering.
Will a VLAN slow down my Wi-Fi?
No measurable impact on throughput in residential settings. VLAN tagging adds 4 bytes per packet, which is invisible against typical home traffic. The only situation where VLANs feel slower is if the firewall rule set has hundreds of rules being evaluated per packet, which does not happen in residential setups.
What is the difference between a VLAN and a subnet?
A subnet is a Layer 3 IP address range. A VLAN is a Layer 2 network segment. They usually map one-to-one in home setups: each VLAN has its own subnet. The distinction matters when configuring switches (VLAN tagging) versus configuring routers (subnet routing). Both must be set up correctly.
Related Articles
- Best Smart Home Sensors 2026 — sensor selection that runs on the IoT VLAN
- Best Smart Security Cameras 2026 — camera traffic deserves its own VLAN
- Best Smart Locks 2026 — lock migration during VLAN cutover
- Can Smart Locks Be Hacked? Security Facts — threat model context
- Indoor Security Camera Privacy — privacy policy beyond network isolation